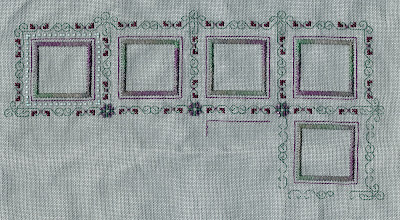
Friday, August 31, 2012

Pulled Thread - Square #4

Last week we snuck away for 5 days.   I had so many stitching plans, but somehow found very little time for stitching.  I was hoping to work on and finish all my pulled thread squares for the biscornu and sampler, but all I managed was to finish my "Stitch for a Cure" needlepoint pilllow.  It was pretty much done, all I had left to do was to backstitch the words.  What can I say - the weather and company was great.


We relaxed by the lake and
 I swam everyday


We played cards.  Phase 10 being my mom's favourite.


                                                                                                                                                                                                                                                            In the evenings we sat by the campfire and roasted marshmellows.
  But it was not all fun and games.  On Friday we had a bush cord of firewood delivered. 
It was all hands on deck to bring the wood over the lake; about 8 trips in total.  Thank goodness we had lots of company.
 
Once home I did manage to work on the next stitch for the pulled thread biscornu.

  4. Spaced Satin Variation

There are many variations to how satin stitches are grouped, arranged, and how many stitches are clustered together.  Each creating it's own unique look.


Click here for the Stitch diagram and instructions

Friday, August 24, 2012

Pulled Thread - Square #3

3. Framed Cross Filling Stitch

I can still remember my first impressions of this stitch, when I first stitched it in a pulled thread workshop I attended many many years ago.

After having completed the first phase (the rows), I didn't know what to make of this stitch; it was just a set of satin stitches and the pattern they created was not that impressive. But as I stitched the second part of the stitch (the vertical paths), I loved the result. 

This stitch is a little more work that the last two stitches, but the outcome is worth it. 
Click here for the stitch diagrams and directions.

Friday, August 17, 2012

Pulled Thread - Square #2

2. Spaced Satin Stitch

This pulled thread stitch is not as open looking as the Satin Step stitch;  it is a great filler stitch and ideal for backgrounds.

I was away this past week, and all I took with me to stitch was my SAL pulled thread project.   I almost finished stitching the border for a 4 x 3 square sampler.  I came to the realization that on 28ct linen a 4 x 4 sampler would be quite large for a box top.  While also planning the next few stitches I have decided, that although I am stitching both the sampler and the 15 sided biscornu, I am going to stitch all the squares for the biscornu first and then decide how I will arrange them in the sampler.

Click here for the Spaced Satin stitch diagram

Friday, August 10, 2012

Pulled Thread 15 sided biscornu


For those of you stitching-a-long for the biscornu, you need to complete 15 squares like the one in this photo.  A backstitched (2 over 2) border with 24 stitches on each side, and a satin stitched (over 4 threads) inner border.  Within each of these squares there will be a different pulled thread pattern.

Click Here for this stitch diagram.


For those of you stitching-a-long for the Sampler, you will need to add this Satin stitch inner border.  This is how my sampler looks so far.
Until I added this inner Satin stitch border using the Caron Collection Wildflower 060, Slate, I was second guessing my colour choices.  But the variegated thread pulled everything together, and I love it again.

                                                                      1. Satin Step Stitch
This is our first stitch.  The group of satin stitches are similar to the Kloster blocks in hardanger, but when pulled tight they create their own unique pattern.

Perle Cotton #12 is recommended for your pulling thread.  However, as Perle Cotton #12 does not have a wide range of colours available you could substitute with Rainbow Gallery's "Subtlety" , Au Ver a Soie's 100/3, or if all else fails 2 strands of cotton floss.
Click here for the stitch pattern
                     

Friday, August 3, 2012

Pulled Thread Stitch-A-Long

I've had a number of hectic eveings this past week, but I managed to complete enough of the design and prepare the chart for this first post.  I enjoyed my 15 sided biscornu so much last year, that I wanted to design another.  However, more of the same would be boring, so it had to be unique.  This time each square will be comprised of a pulled thread stitch.  With last year's biscornu, I know some of you prefered the sampler over the biscornu.  So this time I completed the border pattern first.  This way you can opt to stitch the sampler, the biscornu or both.  I, for one will stitch both.  Here is my sampler so far.
I have a different bead surrounding each square, because I wasn't happy with my first bead choice.  The one I reaaly like is the one on the left, a soft aqua.  


I have even completed two border layouts, a 3 x 5 square sampler and a 4 x 4 square sampler.  For the 4 x 4, I am creating more work for myself, as the 16th square will be an initials square.  Something I hope to complete before we all reach the 15th square.
Another twist to this project is that my 4 x 4 sampler will become the lid of a fabric box, and the matching biscornu one of my stitching treasures to be kept within it.

So choose your layout and lets get started.

Click here for the Colour key & stitching instructions.
Feel free to choose your own colours by first choosing your variegated fibre.
Click here for the 3 square X 5 square Sampler layout.
Click here for the 4 square X 4 square Sampler layout.

For those of you wanting only to stitch the biscornu.  All you will need is a variegated Wildflower, a Perle Cotton #12 to match your linen colour, a solid DMC floss, and bead.  You can replace the Wildflower with a variegated silk or cotton, but these will need to be layed with a laying tool.