Sunday, December 15, 2019

Reindeer Heart Finishing Instructions

The free pattern, colour key and stitching instructions for the 2019 Reindeer 
are available through the previous post.  This post is for the finishing instructions


Reindeer Heart 
Finishing Instructions
The red dotted line on the chart is backstitched using the cream thread.

 I chose to match this thread to the fabric colour, so when the ornament edges are sewn together the edge will hardly be visible.
  If you wish this edge to be more visible, please feel free to use a coloured thread. 
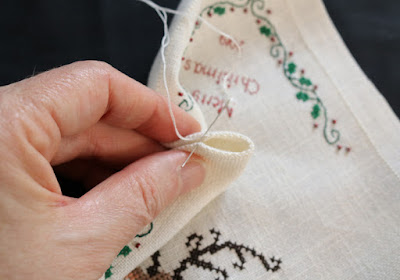
 Fold  the straight edge of the corners under and finger press
 Then fold the sides under and finger press
 Using the same thread used to backstitch the border (in my case, cream), sew the two edges together.  Anchor your thread where the two sides meet, leaving the corner fold open. 

Pair up the backstitches from opposite sides and slip under each matching pair.  Slip towards you with the first pair, and then slip under the next pair away form you.  Continue alternating the direction of your slip stitches in this manner. Do not pierce fabric, only slip under the backstitches.

As you approach the bottom tip of the ornament, 
fold under the other sides and continue. 
 Ensure fabric is tucked inside.
Once you have sewn up on the other side by about an inch, end your thread. 
 Make a slip knot
Hide your thread by stitching down into the ornament.  Stitch down and out with your needle, pull on the thread a bit and cut.  The tail will shrink into the interior.
In the same manner as you started on the one side of the ornament, 
join the other two edges together on the opposite side of the ornament.
Do not completely seal this side.  Leave a gap for stuffing the ornament. 
 Do not cut the sewing thread.
Using a safety pin pull a ribbon through the openings.
  Then stuff the ornament until desired plumpness.
Finishing sewing edge closed.  Then end your thread with a slip knot.  
Hide your thread by stitching down into the ornament.  Bring your needle out, pull 
on the thread a bit and cut.  The tail will shrink into the interior.
Pull the ribbon tight and tie a knot.
  Leaving a desired ribbon length to hang your ornament, 
tie another knot at the top.  Trim excess ribbon. 
 Make a bow out of the remaining ribbon and sew it the base of the ribbon.
 Voila !
Merry Christmas

2019 Christmas Open House


 Gitta's Christmas Open House is here
filled with Happiness and cheer
Fun for all that stitchers call
Our favorite time of the year
Christmas music in the air
meeting friends everywhere
Olden times and reindeer chimes
Our love for cross stitching we all share
Christmas spirits in the air
Stitching friends everywhere
Munchies feasted
And joyful memories shared


Christmas time is here
  Oh, at Gitta's we could always see
Such spirit through the year
But for the next Christmas Open House
We'll have to wait until next year...


Wishing all of you and your families a 
very Merry Christmas and 
all the best for 2020

Stitchers are a special breed, and we look forward to sharing our time with all of you, be it in the shop or on the phone.

Without our stitchers the shop would not be the success it has been for the past 33 years.

It is at this time of year we celebrate not only Christmas but you as well.  As in Christmas' past I have designed another Reindeer to share with all of you.  If you were unable to attend the Christmas Open House this year, we would still like to share this year's reindeer with you.


CLICK HERE  for your copy of the cover photo
CLICK HERE for your copy of the pattern
CLICK HERE for the colour key and stitching instructions
Finishing Instructions will be in the next blog post.


Merry Christmas

Monday, August 5, 2019

Sarah and Evan's Wedding


I am currently sitting up at the cottage and stitching, something I have not gotten to do for a while.   I brought with me a cross stitch I had started many many years ago; it's been so long I can't remember when.  I can, tell you that the pattern, "Commandments" by La D Da, was released in 2002.  So, it's time to complete it.  It's not that I haven't been stitching, it's just that lately I am a better starter. 
I did finish a small wedding sampler for the wedding, which I gave my daughter at the shower.  It's only half of the original design, "Rustic Wedding" by Imaginating.  When I saw the pattern, I knew it would be perfect.  Sarah had a rustic theme, and was going to use chalkboard signage, so I stitched it on "Charcoal" 28ct. Linen by Zweigart.  In the white Rustic frame I was thrilled with the result.  
It's now been three weeks since the wedding, and my husband and I are enjoying a quiet weekend.  The honeymooners are in Mexico, the visitors are all back home and life is getting back to the everyday.  

We are still awaiting the official photo's from the photographer, but I'd like to share some taken by us and some of our quests.  The Wedding was held at "Belcroft Estates" just south of Innisfil in their Marquee Tent.  The grounds are idyllic and other than some showers in the morning the day was perfect.

My beautiful daughter in the bride's suite just before getting into her dress.  And here she comes down the aisle with her Dad, having been driven up by a vintage white Rolls-Royce.


They had chosen a Handfasting ceremony and wrote their own vows.

They then drove off in the Rolls to have their formal photos taken with the bridal party.


While this was happening there was plenty to keep guests entertained.  There was the cocktail party with hors d'oeuvres held on the patio  and games on the lawn.  The games, such as giant Jenga, Croquet, bean bag toss, trivia (about the happy couple's history), bingo, temporary tattoo station, and more, were a big hit with everyone.

Upon their return we also took some family photos.  This one is of us with my Dad.
The reception started with the arrival of the Bride and Groom, and the rest of the evening was very traditional.  Dinner was delicious; starting off with soup, then salad, the main course and lastly dessert.  The speeches were held between each course, as the tables were being cleared.  David & I were up first, then Evan's parents, two of the Grooms-men, two of the Bridesmaids, and finally the Bride and Groom spoke.


Cutting of the cake

The first dance was to "How do I Live"


The dance floor was then open to everyone.
If it became too noisy at this end of the tent,

the patio, and even the furniture,  was all lit up for a quieter hangout spot.

 My sister and I with a few of our cousins had done just that.

To see more photos of the wedding visit my facebook page.